Gebrauchsanleitung SUNVOLLEY PLUS
PARTS
1 bag
1 net
2 bottom part of the pole ( ø 5 cm) with 5 holes for different heights
243 (Men), 230, 224 (Women), 215, 210 (Mini)
2 middle part of the pole ( ø 4,5 cm)
1 upper part of the pole ( ø 5 cm) with pulley
1 upper part of the pole ( ø 5 cm) without pulley
2 ground plates for the poles
4 ground stakes for poles
- Eventually put a hammer in the bag.
HOW TO PUT UP THE SYSTEM
The system is designed to be used on grass. If used on sand, the sand anchors of the SUNVOLLEY sand kit should be used instead of the ground stakes.
It is naturally easier and faster to put up the system with two or more people, but one person alone can also do it.
Marking out the court
1. Mark out the court – 9m x 18m if you use a 9,5m net, 8m x 16m if you use a 8,5m net. If you have a SUNVOLLEY boundary, use the relevant directions for use.
Putting up the poles
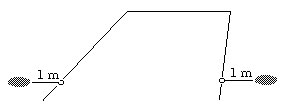
2. Take one of the parts of the poles - all are 1 m long - and measure 1 m to the outside of the middle of the long side of the boundary lines. Press a ground plate into the ground. Do the same on the other side of the field.
3. Put the poles together as shown. Set the desired height with the lower parts of the poles. Top height for men.
Set the desired height only when ropes are not under tension!!! Otherwise you might get hurt between the bottom and the upper part of the pole.
4.Put the poles to the ground plates. Hammer the ground stakes into the ground in about the distance of the length of one pole. To eliminate the risk of injuries hammer the stakes completely into the ground after you have put the guy ropes around. An optimum of stability of the system can only be assured if the stakes are completely sunk into the ground.
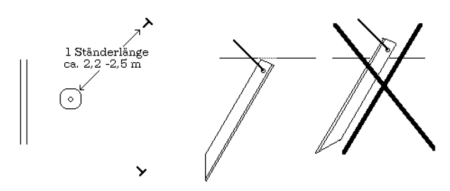
5. Do not yet put the pole on the ground plate but in a position as shown below. In this position you can easily put the net ropes into the rings. Set the desired height only when ropes are not under tension!!!
6. Do the same with pole II.
How to put up and tighten the net
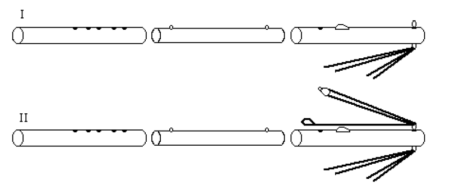
7. Open the net. Put the net between the two poles on the ground.
8. Put the top rope through the ring of pole I. Fasten it with the clamcleat on the pole.
9. Continue with pole II. Fasten the noose of the top rope of the net in the carbine hook of the pulley of pole II.
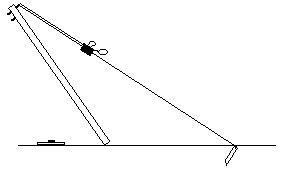
10. Place the poles on the ground plates. Put the poles in a vertical, slightly outside leaning position by tightening the guy ropes. Watch out that the guy ropes do not cross each other on the ring.
11. Pull the pulley rope to tighten the top rope of the net. Fasten the pulley rope with the clamcleat. Check the vertical position of the poles.
12. Tighten the upper side ropes of the net (yellow). Fix the net with these two ropes in the clamcleats, so that the distance between net and pole is about the same on both ends of the net.
13. Put the lower net rope around the poles. Tighten this rope with the attached clamcleats.
14. Also put the lower side ropes of the net (yellow) around the poles. Tighten these ropes with the attached clamcleats to ensure net tension.
15. Check net tension and the ground stakes after a while and retighten if necessary.
MAINTENANCE AND STORAGE
- Clean ground stakes and ground plates after use.
- The volleyball system should be stored in a dry environment.
- If used intensively, the guy ropes should be checked after 2 years.